The Construction Attachment Editor is a tool in the Hurtworld SDK used to create and edit Construction Attachments. It is responsible for everything from specifying attachment points to setting up placement configuration. This article contains a summary of the editor and it's functionality. You can use the Construction Attachment Editor to edit a Construction Attachment by selecting it in Unity, and using the Inspector window.
Overview[ | ]
The Editor has six tabs that can be navigated through the toolbar at the top of the editor.
- Properties - contains configuration about how the attachment appears in the UI, and it's health/armor
- Validation - configures how and where an attachment can be placed
- Attachment Points - configures how other attachments can be attached to this attachment
- Local Points - configures how this attachment attaches to other attachments
- Placement - configures how this attachment is placed (resource costs, placement type, etc)
- Utilities - various utilities
Properties[ | ]
The properties tab specifies two things - the Identifier, and the Construction Properties.
Identifiers[ | ]
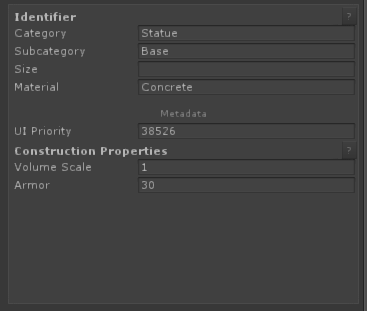
Properties tab
The identifier is a collection of four keys that describe an attachment. Each key correlates to a row on the Construction Menu, Category being the first, Subcategory the second, and so on. Identifiers must generally be unique, and you'll get an error if you attempt to load two attachments with identical identifiers (except in certain cases - see Uniqueness).
- Category - this is the overarching category of the attachment. An example would be "Roof".
- Subcategory - a subcategory, e.g. a subcategory in the roof category might be "Corner"
- Size - the size descriptor, e.g "Large", "Medium" or "Small"
- Hurtworld automatically provides sprites for values of "Large", "Medium" and "Small". It is possible to provide your own sprites to this row, however.
- Material - a string describing what material this attachment is made out of, e.g. "Wood"
- Hurtworld automatically provides sprites for the following material keys: Concrete, Wood, Stone and Iron
- Hurtworld will attempt to set up a Material Type, for things like particle effects, from the Material Key
Metadata[ | ]
The metatdata section contains additional information about how the attachment should display. The UI priority is a number that will inform where the attachment will appear horizontally in the construction menu. High values mean an attachment will be pushed further right. Low values mean an attachment will appear further left.
Construction Properties[ | ]
These are the per-instance properties of an attachment. Here you can influence how resistant an attachment is to explosions, and what it's health is.
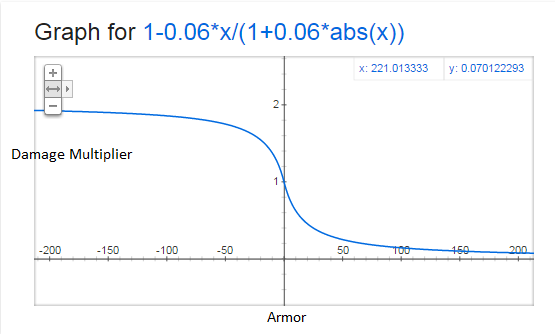
- Armor - This value puts a dampening/buffing effect on damage done to an attachment. See the attached graph for how this value effects damage. Positive values will decrease damage, and negative values will increase damage.
- Volume Scale - This number represents the physical volume vs a standard wall. Larger objects will absorb more damage vs smaller objects. This number will be a linear divisor of the damage. Numbers below 1 will increase the damage taken, and number above one will increase it.
Validation[ | ]
Here we specify how the attachment validates it's position. If an attachment cannot validate a position, it cannot be placed. This is seen in the game as an attachment being red. It's very important to set these values properly, or players may be able to build attachments where they shouldn't be able to.
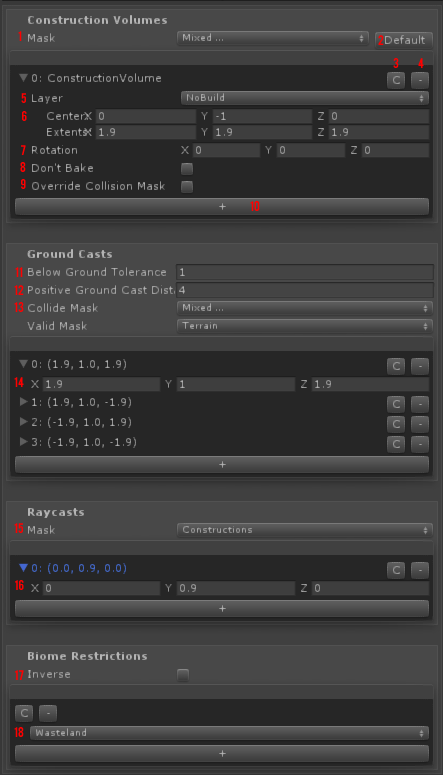
Construction Volumes[ | ]
A construction volume can be thought of as the space that a construction attachment reserves for itself. A construction attachment's mesh can overlap another - notice how walls overlap in the corners, for instance. However, construction volumes can never overlap. These construction volumes are baked into your structures when you place a construction attachment, as a mesh on the NoBuild physics layer. A construction volume is represented by a white, wireframe cube in the scene view.
- Mask - This specifies a mask for what physics layers a construction volume should collide with. If the volume is overlapping anything on these layers, it won't validate.
- Default Mask - pressing this button will set the mask to the default. The default should be sufficient for the vast majority of use cases.
We can now look at the fields on an individual construction volume.
- Duplicate - this will copy the construction volume and place it at the end of the list
- Delete - this will remove the construction volume from the list
- Layer - this is the layer that the construction volume will be created on. This should almost always be the NoBuild layer.
- Center and Extents - the top row here is the position of the center of the volume. The bottom is half the size of the volume. This value is relative to the origin of the construction attachment.
- Rotation - this is the rotation of the construction volume
- Don't Bake - tick this option to say that you don't want this construction volume to be baked into the NoBuild mesh when placed. Use with caution! A use case is doorways - while we want to ensure that the doorway is clear while placing, we want to be able to place a door in there afterwards.
- Override Collision Mask - tick this option to override the mask specified in [1]
- Add button - this button (and all other similar places in the editor) creates a new item in the list

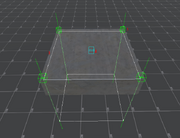
Validation Scene View
Ground Casts[ | ]
Ground casts basically say "casting down from this position, do I hit something?". They are most often used on things like the foundations, and determine if a foundation is being placed on the terrain and not, say, on the third floor of a base. The test for ground casts is that at least all but one must collide with the layer specified in the Valid Mask. A more subtle use case can be found in the fireplace, which can be placed on foundations, but must not be floating above the ground. Ground casts are represented by a green lines in the scene view.
- Below Ground Tolerance - how many meters the cast can go below ground
- Positive Ground Cast Distance - how far the cast should go
- Collide and Valid Masks - the collide mask specifies what layers the cast should hit. The valid mask specifies what layers the cast will consider to be ok. If the cast hits a layer that is in the collide mask, but not in the valid mask, the cast will not validate.
- Cast Position - this is the position of the cast, relative to the construction attachment's origin.
Raycasts[ | ]
Sometimes, you need to make sure that the player can see a construction attachment before placing it. Specify a position here, and a raycast will be done from the player's camera position to this point. This is mostly used for preventing the placement of objects inside other objects. If a construction volume is entirely enveloped by another, it won't realize. For instance, the floors do this. Raycast positions are represented by cyan wireframe cubes in the scene view.
- Mask - these are the layers which this cast will collide with. A collision means the validation will fail.
- Cast Position - this is the position of the cast, relative to the construction attachment's origin.
Biome Restrictions[ | ]
You can also specify which biomes a construction attachment can be placed in. This is currently used to restrict certain drills to certain biomes. If biomes are listed here, the attachment will only be able to be placed in those biomes.
- Inverse - this flips the behaviour, meaning the attachment cannot be placed in the specified biomes.
- Biome Type - select the biome type here
Attachment Points[ | ]
Attachment points are the points to which you can attach other Construction Attachments. In-game, they appear as small green cubes.

An attachment point in-game
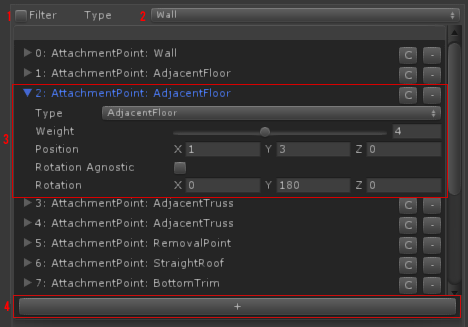
- Toggle Filter - tick this box to only show attachment points that match the type selected int [2]
- Filter Type Selection
- Attachment Point Editor - see below
- Add Attachment Point - this button will add a new Attachment Point to the list
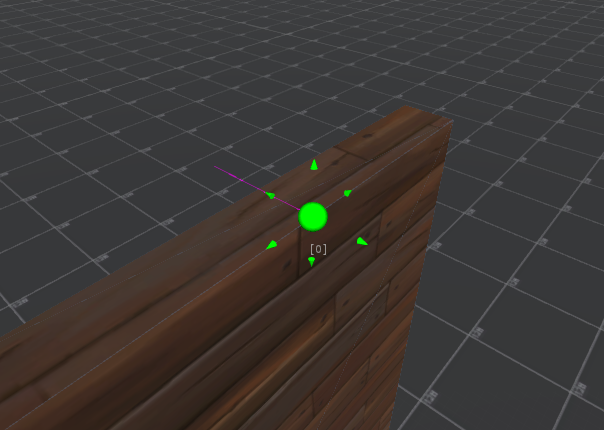

An Attachment Point in the scene view
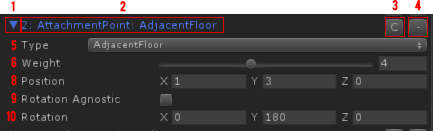
- Use this arrow to expand and collapse an attachment point
- The name of the attachment point
- Duplicate - this button will duplicate an attachment point, and add it to the end of the list
- Delete - this button will remove the attachment point from the list
- Type - what category of attachment point this is, which defines what Construction Attachments can use it
- Weight - how much this point contributes, when placed, to that point in the world. You can create "half" or "quarter" attachment points, which will additively overlay when placing Construction Attachments. An attachment point will not show up or be usable in the world if the weight is less than the required 8.
- Position - where the point is, relative to the Construction Attachment's origin
- Rotation Agnostic - if true, this attachment's rotation will always be "identity", or world-space default, no matter what. This is enforced for Removal Points.
- Rotation - what rotation we should use when attaching another Construction Attachment to this point
Local Points[ | ]
Similar to Attachment Points, these are the points where the Construction Attachment attaches from. You can think of it a bit like an origin. Like Attachment Points, these have a position and a rotation. However, they do not have a weight or a type. Instead, the type is specified in a dropdown box at the top of this tab.

- Local Attachment Type - this is the type of attachment point that this Construction Attachment can attach to.
Placement[ | ]
Here you can configure how the attachment is placed by the player in the world.

- Construction Prefab - what construction prefab should this item use? This is usually GenericConstructionItem. See Construction Prefabs for more information.
- Show In Browser - specifies if the attachment should try to show itself in the Construction Menu
- Refund Item - when the attachment is removed by the hammer, the item that should be refunded to the player
- Refund Amount - as above, the amount of the item to be refunded
Visualization[ | ]
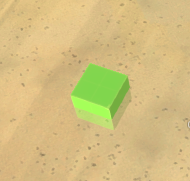
This area specifies how the attachment should visualise when placing. This is the green/red shadow that appears in game while placing an object.
- Mesh - the mesh to be used for visualisation
- Offset - the position of the mesh, relative to the origin of the attachment
- Rotation - the rotation of the mesh
- Scale - the scale of the mesh
Configuration[ | ]
- Prefab - this should always be set to the name of the attachment
- Active - not supported for modding yet. This should NEVER be ticked
- Requires Authority - does the attachment care if the player isn't authorized in a territory? E.g. C4 can be placed without requiring authority.
- Allow On Unclaimed Land - can the attachment be placed somewhere without a stake? E.g. Medusa Vines require a stake to be place.
- Visualize Ownership Cell - does the attachment show the ownership cell grid?
- Ignore Complexity Limit - can the attachment be placed in areas that have reached their complexity limit?
- Has Resource Cost - does the attachment cost resources? This should generally be ticked, unless you know what you're doing.
- Resource Cost Type - what is the resource cost item of the attachment?
- Resource Cost Amount - how many of this resource is required?
- Use Spring - should the attachment move in a "springy" way, or snap to attachment points?
- Seed Item - can the attachment be placed in places other than an attachment point? E.g. foundations are seed items, whereas most other attachments must be built off other attachments.
- Hold Distance - if the attachment is a seed item, how far away can the player look and still place the item?
- Needs Attachment Scan - should we look for attachment points in the level to attach this attachment to? Unless you're creating a GroundConstructionItem attachment, this should probably be yes.
Advanced Concepts[ | ]
Inheritance[ | ]
Often, an attachment will very closely resemble another attachment in a pack. For instance, a wooden 3 metre wall is identical to a stone 3 meter wall in all but the actual rendered material, armor and Material Key. In these cases, where the Attachment Points, Local Points or Validation will often be identical, we can set one Attachment to copy it's data from another. This reduces maintenance overhead. To set an attachment to inherit from another, drag the parent attachment from the project view into the Inherited Object field. You can then select what data you want the attachment to inherit.
Uniqueness[ | ]
Construction attachments must be unique, as the game must be able to turn information about an attachment into a concrete reference to that attachment at some point. An attachment is considered to be unique if there is no other currently loaded attachment with the same:
- Identifier
- Local Attachment Type
- Construction Prefab